
Showing posts with label Computer tips. Show all posts
Showing posts with label Computer tips. Show all posts
 As Diwali is near and all of the Blog master wants to wish their fans and their website visitor for a Happy Diwali. So, Today I will tell you How to add Diwali Fireworks Effects on your blogger .
Just Follow the Steps below
1. Login to your Blogger account
2. Go to layout and click add a gadget
3. Click on Html/Javascript and paste the code given below
<script type="text/javascript">
// <![CDATA[
var bits=80; // how many bits
var speed=33; // how fast - smaller is faster
var bangs=5; // how many can be launched simultaneously (note that using too many can slow the script down)
var colours=new Array("#03f", "#f03", "#0e0", "#93f", "#0cf", "#f93", "#f0c");
// blue red green purple cyan orange pink
/****************************
* Fireworks Effect *
*(c)2010-13 Babu Sharma*
* http://www.babusharma.tk *
* DON'T EDIT BELOW THIS BOX *
****************************/
var bangheight=new Array();
var intensity=new Array();
var colour=new Array();
var Xpos=new Array();
var Ypos=new Array();
var dX=new Array();
var dY=new Array();
var stars=new Array();
var decay=new Array();
var swide=800;
var shigh=600;
var boddie;
window.onload=function() { if (document.getElementById) {
var i;
boddie=document.createElement("div");
boddie.style.position="fixed";
boddie.style.top="0px";
boddie.style.left="0px";
boddie.style.overflow="visible";
boddie.style.width="1px";
boddie.style.height="1px";
boddie.style.backgroundColor="transparent";
document.body.appendChild(boddie);
set_width();
for (i=0; i<bangs; i++) {
write_fire(i);
launch(i);
setInterval('stepthrough('+i+')', speed);
}
}}
function write_fire(N) {
var i, rlef, rdow;
stars[N+'r']=createDiv('|', 12);
boddie.appendChild(stars[N+'r']);
for (i=bits*N; i<bits+bits*N; i++) {
stars[i]=createDiv('*', 13);
boddie.appendChild(stars[i]);
}
}
function createDiv(char, size) {
var div=document.createElement("div");
div.style.font=size+"px monospace";
div.style.position="absolute";
div.style.backgroundColor="transparent";
div.appendChild(document.createTextNode(char));
return (div);
}
function launch(N) {
colour[N]=Math.floor(Math.random()*colours.length);
Xpos[N+"r"]=swide*0.5;
Ypos[N+"r"]=shigh-5;
bangheight[N]=Math.round((0.5+Math.random())*shigh*0.4);
dX[N+"r"]=(Math.random()-0.5)*swide/bangheight[N];
if (dX[N+"r"]>1.25) stars[N+"r"].firstChild.nodeValue="/";
else if (dX[N+"r"]<-1.25) stars[N+"r"].firstChild.nodeValue="\\";
else stars[N+"r"].firstChild.nodeValue="|";
stars[N+"r"].style.color=colours[colour[N]];
}
function bang(N) {
var i, Z, A=0;
for (i=bits*N; i<bits+bits*N; i++) {
Z=stars[i].style;
Z.left=Xpos[i]+"px";
Z.top=Ypos[i]+"px";
if (decay[i]) decay[i]--;
else A++;
if (decay[i]==15) Z.fontSize="7px";
else if (decay[i]==7) Z.fontSize="2px";
else if (decay[i]==1) Z.visibility="hidden";
Xpos[i]+=dX[i];
Ypos[i]+=(dY[i]+=1.25/intensity[N]);
}
if (A!=bits) setTimeout("bang("+N+")", speed);
}
function stepthrough(N) {
var i, M, Z;
var oldx=Xpos[N+"r"];
var oldy=Ypos[N+"r"];
Xpos[N+"r"]+=dX[N+"r"];
Ypos[N+"r"]-=4;
if (Ypos[N+"r"]<bangheight[N]) {
M=Math.floor(Math.random()*3*colours.length);
intensity[N]=5+Math.random()*4;
for (i=N*bits; i<bits+bits*N; i++) {
Xpos[i]=Xpos[N+"r"];
Ypos[i]=Ypos[N+"r"];
dY[i]=(Math.random()-0.5)*intensity[N];
dX[i]=(Math.random()-0.5)*(intensity[N]-Math.abs(dY[i]))*1.25;
decay[i]=16+Math.floor(Math.random()*16);
Z=stars[i];
if (M<colours.length) Z.style.color=colours[i%2?colour[N]:M];
else if (M<2*colours.length) Z.style.color=colours[colour[N]];
else Z.style.color=colours[i%colours.length];
Z.style.fontSize="13px";
Z.style.visibility="visible";
}
bang(N);
launch(N);
}
stars[N+"r"].style.left=oldx+"px";
stars[N+"r"].style.top=oldy+"px";
}
window.onresize=set_width;
function set_width() {
var sw_min=999999;
var sh_min=999999;
if (document.documentElement && document.documentElement.clientWidth) {
if (document.documentElement.clientWidth>0) sw_min=document.documentElement.clientWidth;
if (document.documentElement.clientHeight>0) sh_min=document.documentElement.clientHeight;
}
if (typeof(self.innerWidth)!="undefined" && self.innerWidth) {
if (self.innerWidth>0 && self.innerWidth) sw_min=self.innerWidth;
if (self.innerHeight>0 && self.innerHeight) sh_min=self.innerHeight;
}
if (document.body.clientWidth) {
if (document.body.clientWidth>0 && document.body.clientWidth) sw_min=document.body.clientWidth;
if (document.body.clientHeight>0 && document.body.clientHeight) sh_min=document.body.clientHeight;
}
if (sw_min==999999 || sh_min==999999) {
sw_min=800;
sh_min=600;
}
swide=sw_min;
shigh=sh_min;
}
// ]]>
</script>
Click here to View the live demo


Sky Sports 1 Live
For all latest cricket updates and to watch cricket live go to www.freecricket.tk
Watch Sky Sports HD 1 Live Streaming at www.babusharma.tk
Sky Sports is part of the television company BSKYB (British Sky Broadcating) owned by Austrailian Rupert Murdoch who also owns the newspaper The Sun.
Sky Sports 1 Live is the main Sky Sports channel out of the four channels. Sky Sports 1 has the most and best sport you can find on television. Here's some of the sport you'll find on Sky Sports 1. ( Football, Soccer, Cricket, Tennis )
If you own your own blog whose URL is something like this: YOURNAME.BLOGSPOT.COM ?
Then its high timed you moved to an original domain name like .com, .net or .tk
Here I am going to explain how to set .tk domain for your blogspot blog. Because .tk is a free service, it can be affordable by anyone.


In destination field, type "ghs.google.com" (Without quotations) and click "Save"

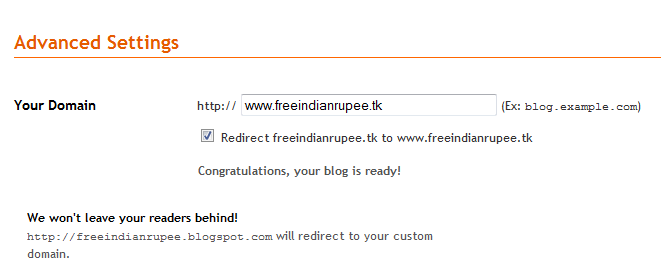
Now, after you click the "Save Settings" button you will see the following screen with the message "Settings are saved". Now you can see one check box named "Redirect yourdomain.tk to www.yourdomain.tk". Check that checkbox and again save settings. A screenshot is shown below:


Then its high timed you moved to an original domain name like .com, .net or .tk
Here I am going to explain how to set .tk domain for your blogspot blog. Because .tk is a free service, it can be affordable by anyone.
In this tutorial I'll show you how I change my blog freeindianrupee.blogspot.com to freeindianrupee.tk
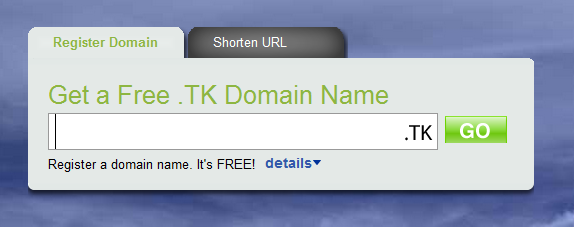
first of all go to dot.tk and register your free domain and create your account
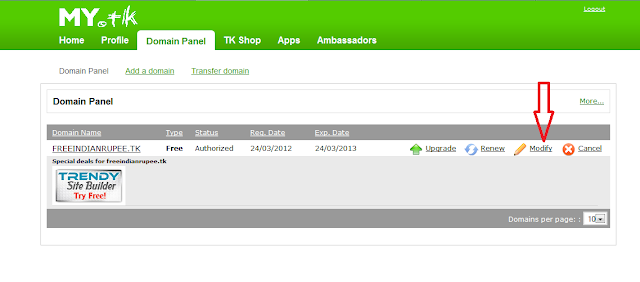
login to your dot.tk account then go to domain panel and click modify
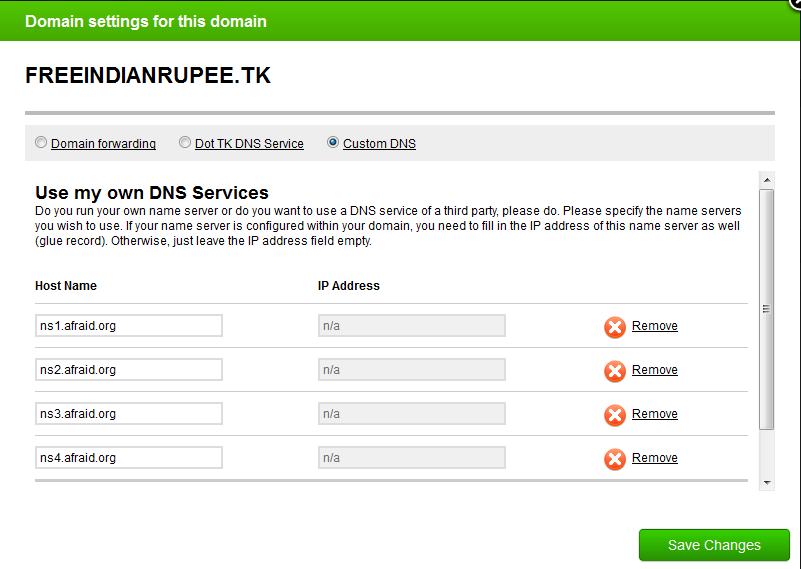
A pop up window will be opened
Now select custom domain and fill the details as shown in image below
You will see text boxes for name servers. Please enter your name servers exactly as filled up in above image. You are using free DNS service by afraid. I will tell you how to create DNS records in afraid.org. So, for now, type all these four name servers and click Next. You should get a message like "Succesfully updated changes."
four name servers are
ns1.afraid.org
ns2.afraid.org
ns3.afraid.org
ns4.afraid.org
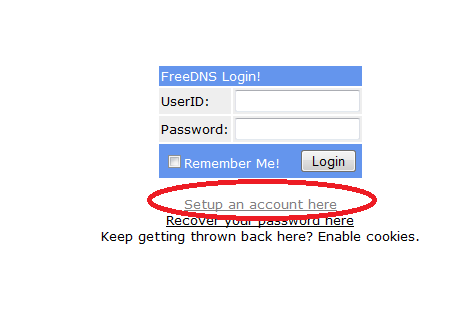
Now go to afraid.org and click "Domains" option on the left side under "For Memebers" section. You will be redirected to one login page which looks like this
Now all you need is to create an account there. Give up all the information required to create an acount. Activate your account by clicking Verification link which will be send to you at your E-Mail address.
After activating your account. Login to your afraid account
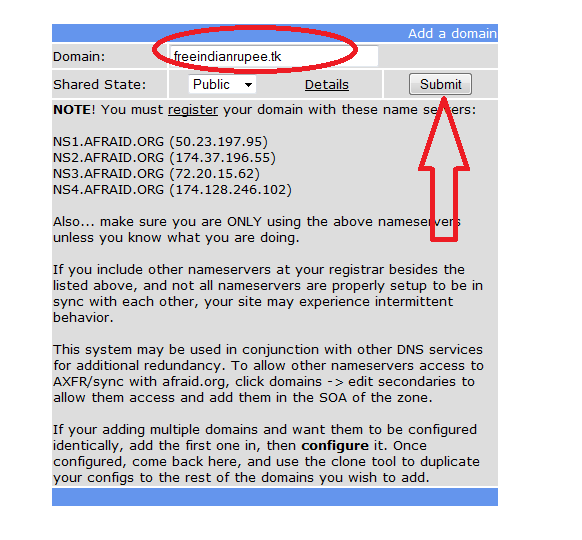
On clicking "Domains". You will see one option "Add a domain free DNS". Click on it to add your .tk domain. You will see following options to add your domain.
Add your TK domain in domain field and click "Submit" button.
Now click "Domain" option on left side and your will be redirected to the following screen.
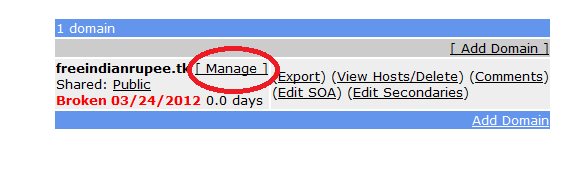
Click "Manage" option and you will see following screen with all records which are not configured.
Select all records which are selected in above image. Do not select yourdomain.tk and click delete.
Now click ADD button on the upper right and down right as shown in figure above
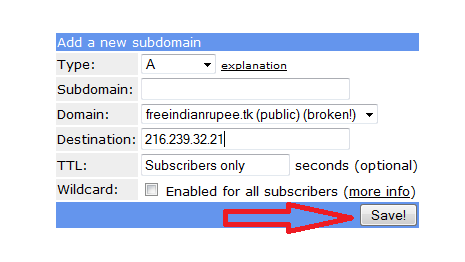
Keeping type as "A", Leave Subdomain field empty and in Destination field type "216.239.32.21" and click Save.
Now repeat this step again and simply add three other different Destination fields which are given below:
216.239.34.21
216.239.36.21
216.239.38.21
216.239.36.21
216.239.38.21
So, like this you will get total four records. Now, the very important and the last thing left to do is to add one CNAME record using the same process.
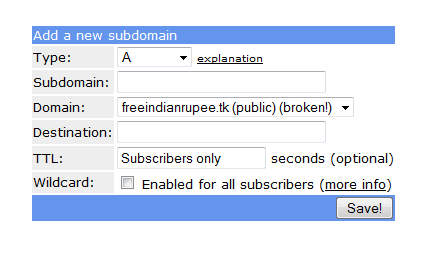
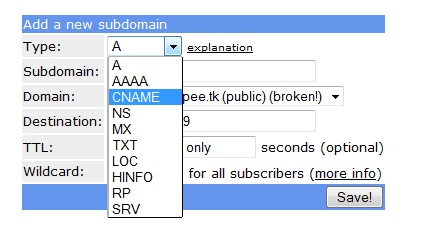
For this, again click on ADD option and this time select "CNAME" record instead of "A" record. Here is a screenshot:
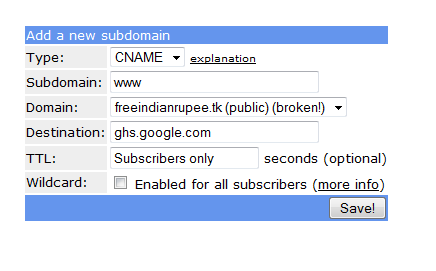
Further, in subdomain field type "www" (Without quotations)
In destination field, type "ghs.google.com" (Without quotations) and click "Save"
Now all you need to do is login to your blogger account
Click setting option in dashboard
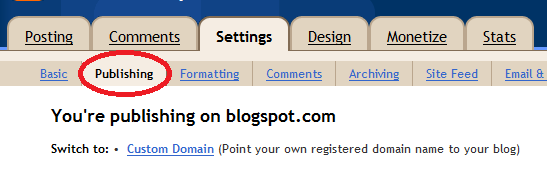
In the next page click publishing option under setting tab
Click on the "Custom Domain" and on next page
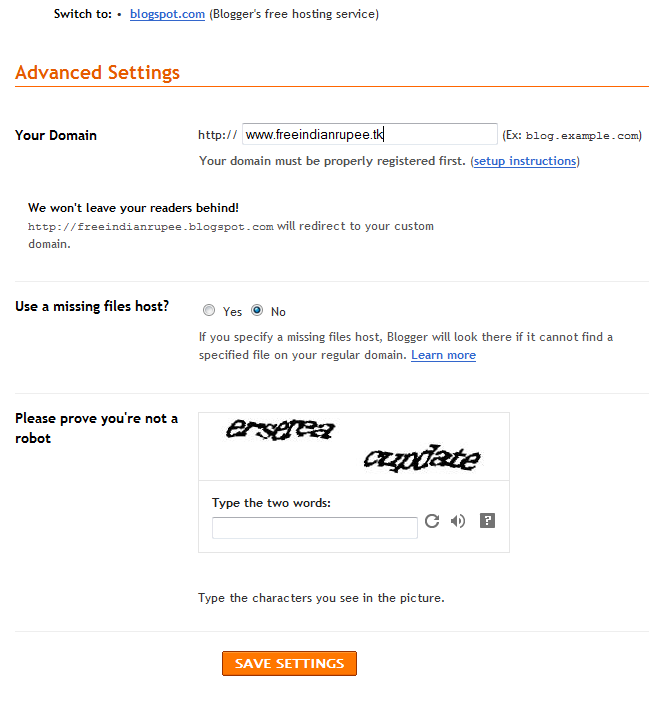
In the above text field. Type your domain and click "Save Settings" button at the bottom of page.
Now, after you click the "Save Settings" button you will see the following screen with the message "Settings are saved". Now you can see one check box named "Redirect yourdomain.tk to www.yourdomain.tk". Check that checkbox and again save settings. A screenshot is shown below:
Normally, nameservers take some time to delegate. It may takes 24-72 hours to make your TK domain work properly. So, be patient. If you still find any difficulty using this process or you have some doubts, feel free to share below.
I like anything that makes Facebook user-friendly and easy to use. I like using the facebook a lot and I am a regular user of Facebook but sometimes when you are browsing the news feed you might happen to come across a photo which might be of interest to you but it may be too small for viewing the details of such a photo are hardly visible without enlarging it. So you click the photo to make it enlarge and then click it again to close it. This process can be too time consuming and tedious as no one has the patience to wait for so long not to mention about the wear and tear on the mouse.
Fortunately, there's a way to enlarge Facebook photos without a single click. All you need is the right extension for your Web browser: FB Photo Zoom for Chrome and Thumbnail Zoom for Firefox.

Once you install this you will find it much easier to relate to facebook photos and accessing it would become much simpler process. Just move your mouse over them. You just have to place your cursor on top of any photo in your news feed then wait for a second the photo appears full size.
Thumbnail Zoom also works with Amazon, Twitter, and lots of other sites that use thumbnail images if you are a regular firefox user.
If you are a Facebook fan its worth giving it a try and see how it makes things faster and simpler.
Fortunately, there's a way to enlarge Facebook photos without a single click. All you need is the right extension for your Web browser: FB Photo Zoom for Chrome and Thumbnail Zoom for Firefox.
Once you install this you will find it much easier to relate to facebook photos and accessing it would become much simpler process. Just move your mouse over them. You just have to place your cursor on top of any photo in your news feed then wait for a second the photo appears full size.
Thumbnail Zoom also works with Amazon, Twitter, and lots of other sites that use thumbnail images if you are a regular firefox user.
If you are a Facebook fan its worth giving it a try and see how it makes things faster and simpler.
Updating Windows is a necessary task to ensure security and privacy, as well as to apply bug fixes. Windows update provides an easy and automated installation, but if you don't have internet connection or have slow internet connection then you can't get the updates directly from Microsoft instead you have to use a third party utility called AutoPatcher. AutoPatcher allows you to install windows updates offline without internet connection.
How to update Windows OS without internet


How to update Windows OS without internet
- Carry your Pen Drive and go to your nearby Cyber Cafe then download Autopatcher software from here.
- After downloading this software just install and run it.

- Click next and let the program build its executable file.
- Now select your OS whether it is 32-bit or 64-bit supported. If it is 32-bit then select X86 othewise select X64 and click on next button.

- Once this is complete, a new file with the name autopatcher.exe will be created in your initial download folder (the one where you ran apup.exe from).
- Copy the entire folder to your pendrive and paste it to computer where you want to install the updates.

- Run this new file autopatcher.exe from your computer, agree to the license terms and tell the program which updates you want to install
- All done Enjoy!!!!!!
- Use this method to install updates for XP and Vista also
If somehow you have forgotten your windows password and are looking for way around to login back into your computer then you won't have to worry. There are many methods are available for resetting password of your windows 7 or vista. But many of them are lengthy or sophisticated. This is one of the simplest method and you only need a windows 7 Installation CD/USB to reset the password.
How to reset windows password

copy c:\windows\system32\sethc.exe c:\

copy c:\windows\system32\cmd.exe c:\windows\system32\sethc.exe
net user test newpassword

Note:
Test is the username of the computer and newpassword is the password. Replace both with your username and password as you wish
Login in your computer system with your new password.
Now every time when you press shift key for 5 times then command prompt will be opened instead of sticky keys. To get back these sticky keys repeat first three steps and then in the command prompt window type the following command.
copy c:\sethc.exe c:\windows\system32\sethc.exe
all done enjoy cracking
Note: You can also change XP/Vista password with this method
How to reset windows password
- Insert windows 7 disk into your CD Rom and Restart your computer.
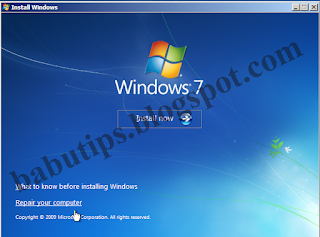
- Press any key to Boot from the Cd and then click on Repair your Computer

- Now from the various options select Command Prompt.

- Now command Prompt will be open and create a backup of sticky keys by typing the following command in the command prompt
copy c:\windows\system32\sethc.exe c:\

- Now replace sticky keys with the Command Prompt by typing the following command
copy c:\windows\system32\cmd.exe c:\windows\system32\sethc.exe
- Now restart your computer.
- When you get the windows login screen then hit shift button for 5 times continuously and administrative mode of Command Prompt will be open.
- Now reset the password just type following password
net user test newpassword

Note:
Test is the username of the computer and newpassword is the password. Replace both with your username and password as you wish
Login in your computer system with your new password.
Now every time when you press shift key for 5 times then command prompt will be opened instead of sticky keys. To get back these sticky keys repeat first three steps and then in the command prompt window type the following command.
copy c:\sethc.exe c:\windows\system32\sethc.exe
all done enjoy cracking
Note: You can also change XP/Vista password with this method

A word of caution here. Before installing Deep Freeze, or enabling it, it is advisable to make a review of the files and programmes that you intend to keep on your machine. Once you have finalised the files, go ahead and install Deep Freeze, as indicated below, and the files/programmes would remain frozen till you disable the programme.It may be mentioned here that in the event of deciding to keep additional files/programmes or modifying/deleting them on a permanent footing, you need to disable the programme first. The process of disabling has been described below in detail. Enabling the Deep Freeze after installation of new programmes would take newer files as well in the default section, and that would also be frozen
Deep Freeze Standard – Installation and Uses
It is pertinent to mention that soon after the installation, and before, restarting your computer, you must ensure to put an appropriate password that would be handy for you to enable/disable the programme. Note : If you fail to enter the correct password, you will never be able to Thaw (Unfreeze) your computer, even if you have attempted to format the drive. Procedure to apply the ‘password’ is given below

Product version DeepFreeze Standard 7.21.060.3447
2. Use the given serial key to register
3. After installing go to Notification Area Icons
4. You will there find Deep Freeze icon
5. Open it by pressing – (CTRL + SHIFT + ALT +F6) or (SHIFT + double Click)
6. Go to ‘password’ tab and fill up the relevant column
7. The password that you have entered, will only allow to make changes in Deep Freeze
8. Restart, and your computer get Deep Frozen
Now a question arises: “Once Deep Freeze has been installed, will it be possible to install a programme or file?” The answer is a simple ‘yes’. It is possible to install a programme or file through the following procedure
–:
1. Go again to the Notification Area Icons
2. Open Deep Freeze, as detailed above
3. Enter the relevant password
4. Go to ‘status’ tab, and tick ‘Boot Thawed’, and click ‘Apply and Reboot’
5. This allows you to unfreeze your computer to enable you to add, modify or delete files
6. For ensuring against tampering with your computer contents, you may again go for freezing your computer by following the above procedure, excepting the last one, where instead of ticking on ‘Boot Thawed’, tick on ‘Boot Frozen’.
7. Click ‘Apply and Reboot’ and your computer will be back to the frozen state with the changes you sought.

Mostly you need certain information in the form of text from scanned copies of documents.Either you can write the whole text by typing or you can use an OCR software.OCR (optical Character recognition) is method to extract text from images.It can recognise handwritten,printed or typewritten text and can reproduce them into editable word or txt format.
These OCR software also preserve the formatting of the original scanned document into converted document.They are not 100% accurate and the converted document still requires some editing.But it is better to use an OCR software and do some editing rather to type the whole Document.

If you have Microsoft office installed in your computer then you won’t need any other third-party software as you can use Microsoft Office OneNote to copy text from image.
These OCR software also preserve the formatting of the original scanned document into converted document.They are not 100% accurate and the converted document still requires some editing.But it is better to use an OCR software and do some editing rather to type the whole Document.
If you have Microsoft office installed in your computer then you won’t need any other third-party software as you can use Microsoft Office OneNote to copy text from image.
- For this you have to install MS-Office on your system.
- Now open Microsoft Office OneNote (Start–>All Programs–>Microsoft Office–>Microsoft Office OneNote).
- Drag and Drop the image in the MS-OneNote window from which you want copy the text.
- Now Right-Click on the image and select Copy Text From Picture option.
- Open note pad or MS-Office and save the content there.
There is a utility given in the Microsoft Windows named as Disk Defragmenter which is designed for maximizing the access speed, it rearranges the relevant data files stored on the disk for occupying associated storages. This process is known as defragmentation. It can be describes as the process of consolidating the fragmented files which are on the PC's hard disk.

This process happens on the hard disk when you save, change or delete any file. When you make any changes to a file they are stored usually at the location which is different from the original file location. With time the file and the hard disk both are fragmented and the computer speed slows down because it looks in different paths and location to open the required file. It can be done for computer maintenance work as many firms offer this service.
It is a tool which rearranges data from hard disk and then combines them into fragmented files. It makes your computer to run more conveniently. With this Windows version it runs with a predefined schedule and you don't need to run it again and again but its schedule can be changed. Since it is a tool and also used as a service most of the PC maintenance services providers use it. We can check the process of disk defragmentation as follows:
a) Firstly click the Start Button, in the search box type disk defragmenter and click on it from the given results or you can simply open disk defragment by open windows explorer, right click on any drive and select properties, tools, and disk defragment
b) A box will open showing the different disks, click on the disk you want to defragment.
c) First check whether the disk should be defragmented or now click Analyze disk. If it required for an administrator password provide the confirmation.
d) When it finished analyzing the disk you can check the percentage of the fragmentation in the last run column. The disk can be fragmented if the percentage is above ten percent.
It might take some minutes to hours to complete the process and it depends on the size of the disk as well as the number of the fragmented files. If any volume is not to displaying in the select disk dialog box and it has to be defragmented then it should be done manually.
It is an important work that must be done at a regular interval in order to prevent the risk of complete system failure or physical damage to the hard drive.

This process happens on the hard disk when you save, change or delete any file. When you make any changes to a file they are stored usually at the location which is different from the original file location. With time the file and the hard disk both are fragmented and the computer speed slows down because it looks in different paths and location to open the required file. It can be done for computer maintenance work as many firms offer this service.
It is a tool which rearranges data from hard disk and then combines them into fragmented files. It makes your computer to run more conveniently. With this Windows version it runs with a predefined schedule and you don't need to run it again and again but its schedule can be changed. Since it is a tool and also used as a service most of the PC maintenance services providers use it. We can check the process of disk defragmentation as follows:
a) Firstly click the Start Button, in the search box type disk defragmenter and click on it from the given results or you can simply open disk defragment by open windows explorer, right click on any drive and select properties, tools, and disk defragment
b) A box will open showing the different disks, click on the disk you want to defragment.
c) First check whether the disk should be defragmented or now click Analyze disk. If it required for an administrator password provide the confirmation.
d) When it finished analyzing the disk you can check the percentage of the fragmentation in the last run column. The disk can be fragmented if the percentage is above ten percent.
It might take some minutes to hours to complete the process and it depends on the size of the disk as well as the number of the fragmented files. If any volume is not to displaying in the select disk dialog box and it has to be defragmented then it should be done manually.
It is an important work that must be done at a regular interval in order to prevent the risk of complete system failure or physical damage to the hard drive.
If you have a computer you are not unfamiliar to computer repairs. It is inevitable that your computer will eventually run slow or not at all especially if you are a novice to technology which lets admit most of us are. One of the biggest reasons clients bring their computers in is that they are slower than when they first purchased them. They always want to know who or what is to blame for this. No one wants to hear it but the problem your computer may be running slower than when you purchase it is... YOU!
Maintenance is the key in making sure your computer keeps running at peak performance. Just like your car needs regular oil changes and filter changes your computer needs tune ups to clean up the registry of old programs not in use, updates on spyware and adjustment of settings to insure peak performance. Of course there could be more reasons for the slow down. It is best to take the computer in to a local computer repair firm, as you would your car to a mechanic; to have it thoroughly looked at.
Other reasons that your computer may be having issues running slower than normal could be that your computer has contracted a virus. spyware and malware may be the cause of the issue with your computer running slowly. Spyware creates an issue where outsiders have gotten into your computer without you knowing it and start sending out personal data to entities that will take advantage of your system and cause it to run slowly. Even if you have up to date virus protection you can still become infected it just lessens the likelihood. Computer repair in the form of a virus scan and removal are needed and can be done at your local computer repair store. It is also recommended that a tune up be performed on your PC at this time to regain the speed and efficiency of your computer.
You can also inspect your computer and delete files and programs that have been added that are unnecessary. The more files and programs you keep stored on the hard drive of your computer the slower it will run. I recommend having a separate flash drive to store big files such as pictures, word and excel documents. The space adds up quickly. Also, delete any unnecessary short cuts on your desk top they could be causing your computer to run at a snail's pace.
It is important if you have tried all of the similar solutions to look at the computer's hard drive. Run a disk defragmenter which will help optimize how data is stored and then Scandisk to help ensure nothing is actually corrupt within the drive.
Another issue that is common is that the processor is overheating. This is common. You will want to first make sure the cooling system in the computer, the fan, is running. If not it will need to be shut off and taken in for the fan to be replaced. If the fan is running look to make sure a build-up of dust is not causing an issue or that the cabinet the computer is stored in is not blocking the air flow. I have found this happens to me when I am in bed using the laptop and forget about the heat issue. If I set the computer on the blankets the air flow is blocked and the computer will have issues.
Memory, hard drive disk space and conflict in hardware/software are all problems that could also be responsible for the slowing down of your computer. If you have a computer repair check all of the above and there is still issues they will most likely recommend you do an OS reload. Basically this will consist of wiping the computer clean and reloading your operating system. Make sure your data is backed up before doing this. Also, this requires installation of the programs that you run on your computer. This is basically a last resort but it will make your computer like when you first brought it home.